Curate - Core Visuals
📔 Overview
Core Visuals are a key component to assembling a Concept Explorer within your Project and adding one is as simple as adding other pieces of content. To learn more about Core Visuals and their purpose visit Content Types in NimbleStory | 📕-Core-Visuals.
NOTE: To perform this function you must have the proper Create and Edit permissions applied to your user account. If you do not see the Add Content card on your screen, contact your Project or Org Admin for support.
📗 Adding Core Visuals

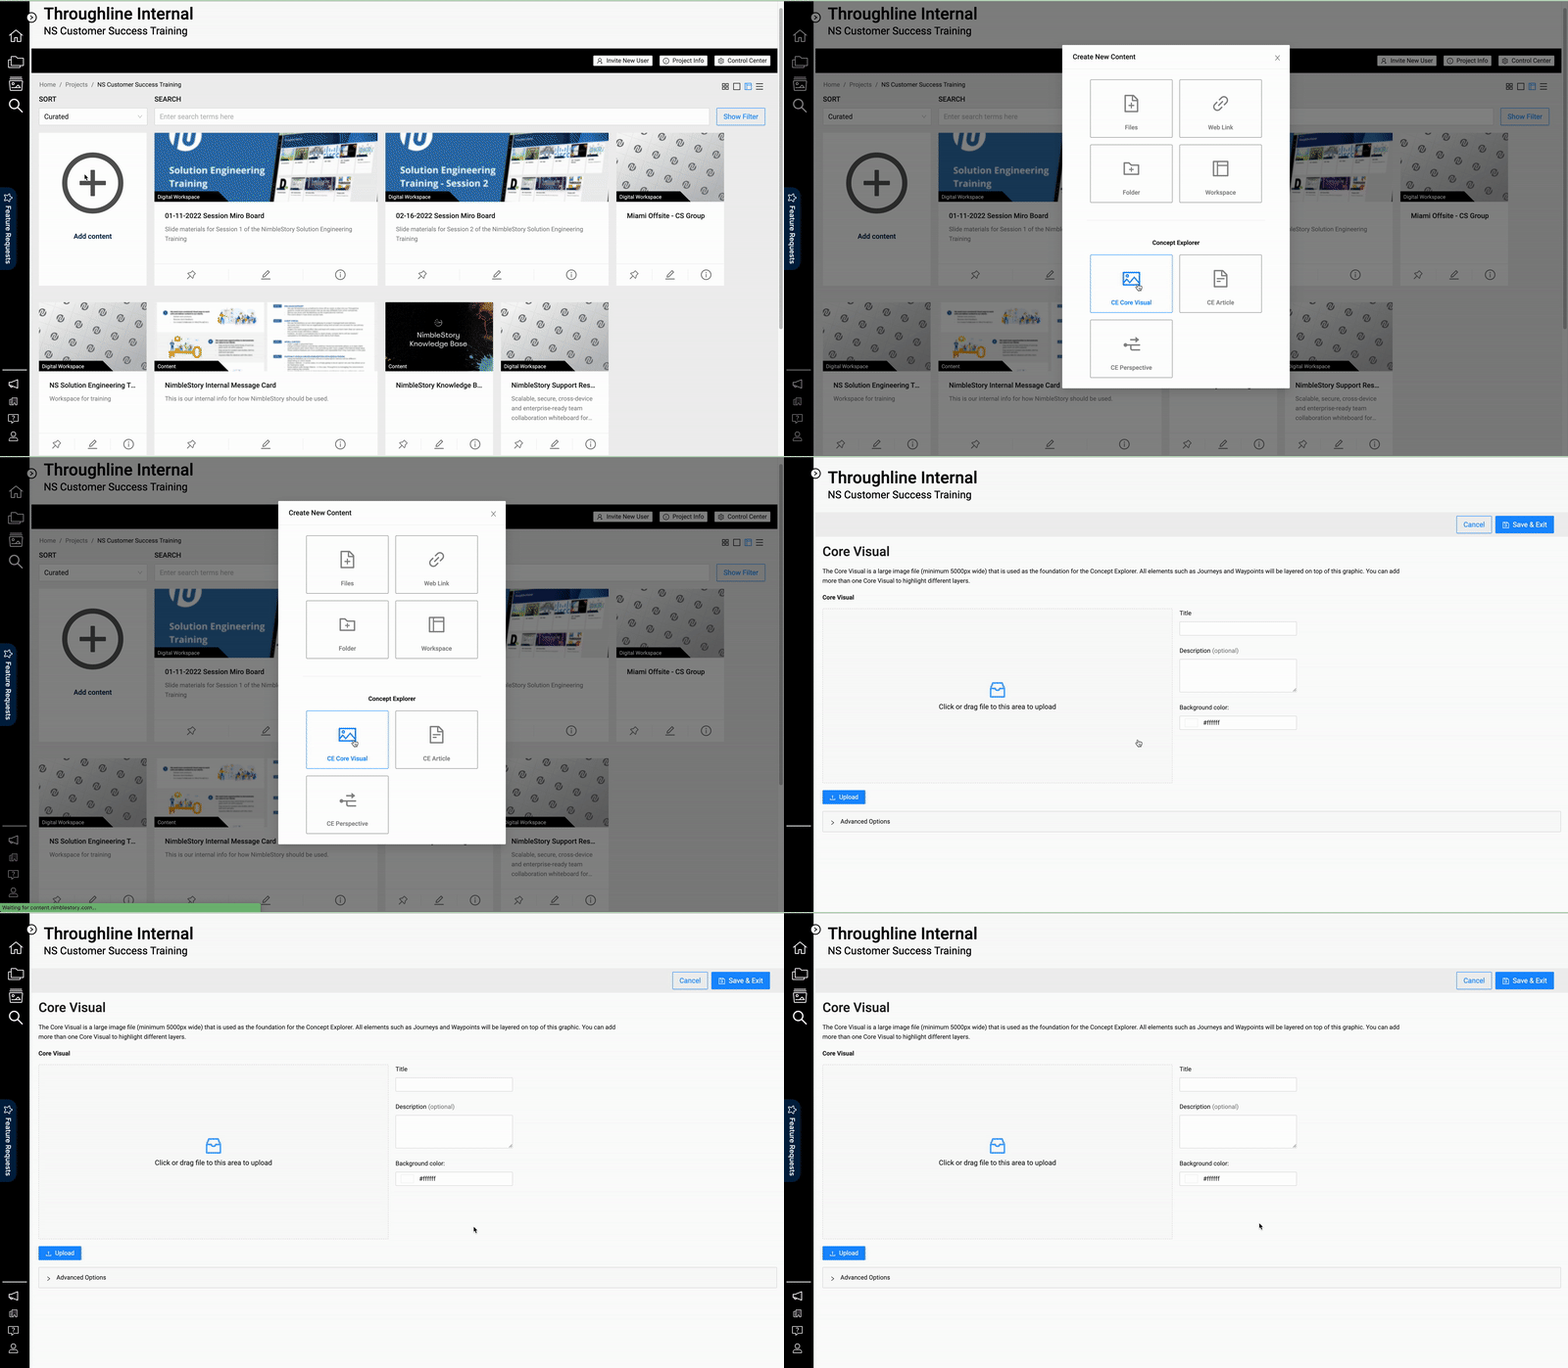
Example of accessing the Core Visual Editor
From the Project Details view you can select the Add Content card and from that view select the CE Core Visual button under the Concept Explorer section. This will take you to Core Visual Editor screen. Within this view you will have a few options that are made available to you including:
Title – Provide a name for the Core Visual that is rendered on the card displayed in the Project Details view.
Description (Optional) – Provide a brief description of what the image is.
Background Color – Defining the color of the screen that will appear behind and around the loaded Core Visual image.

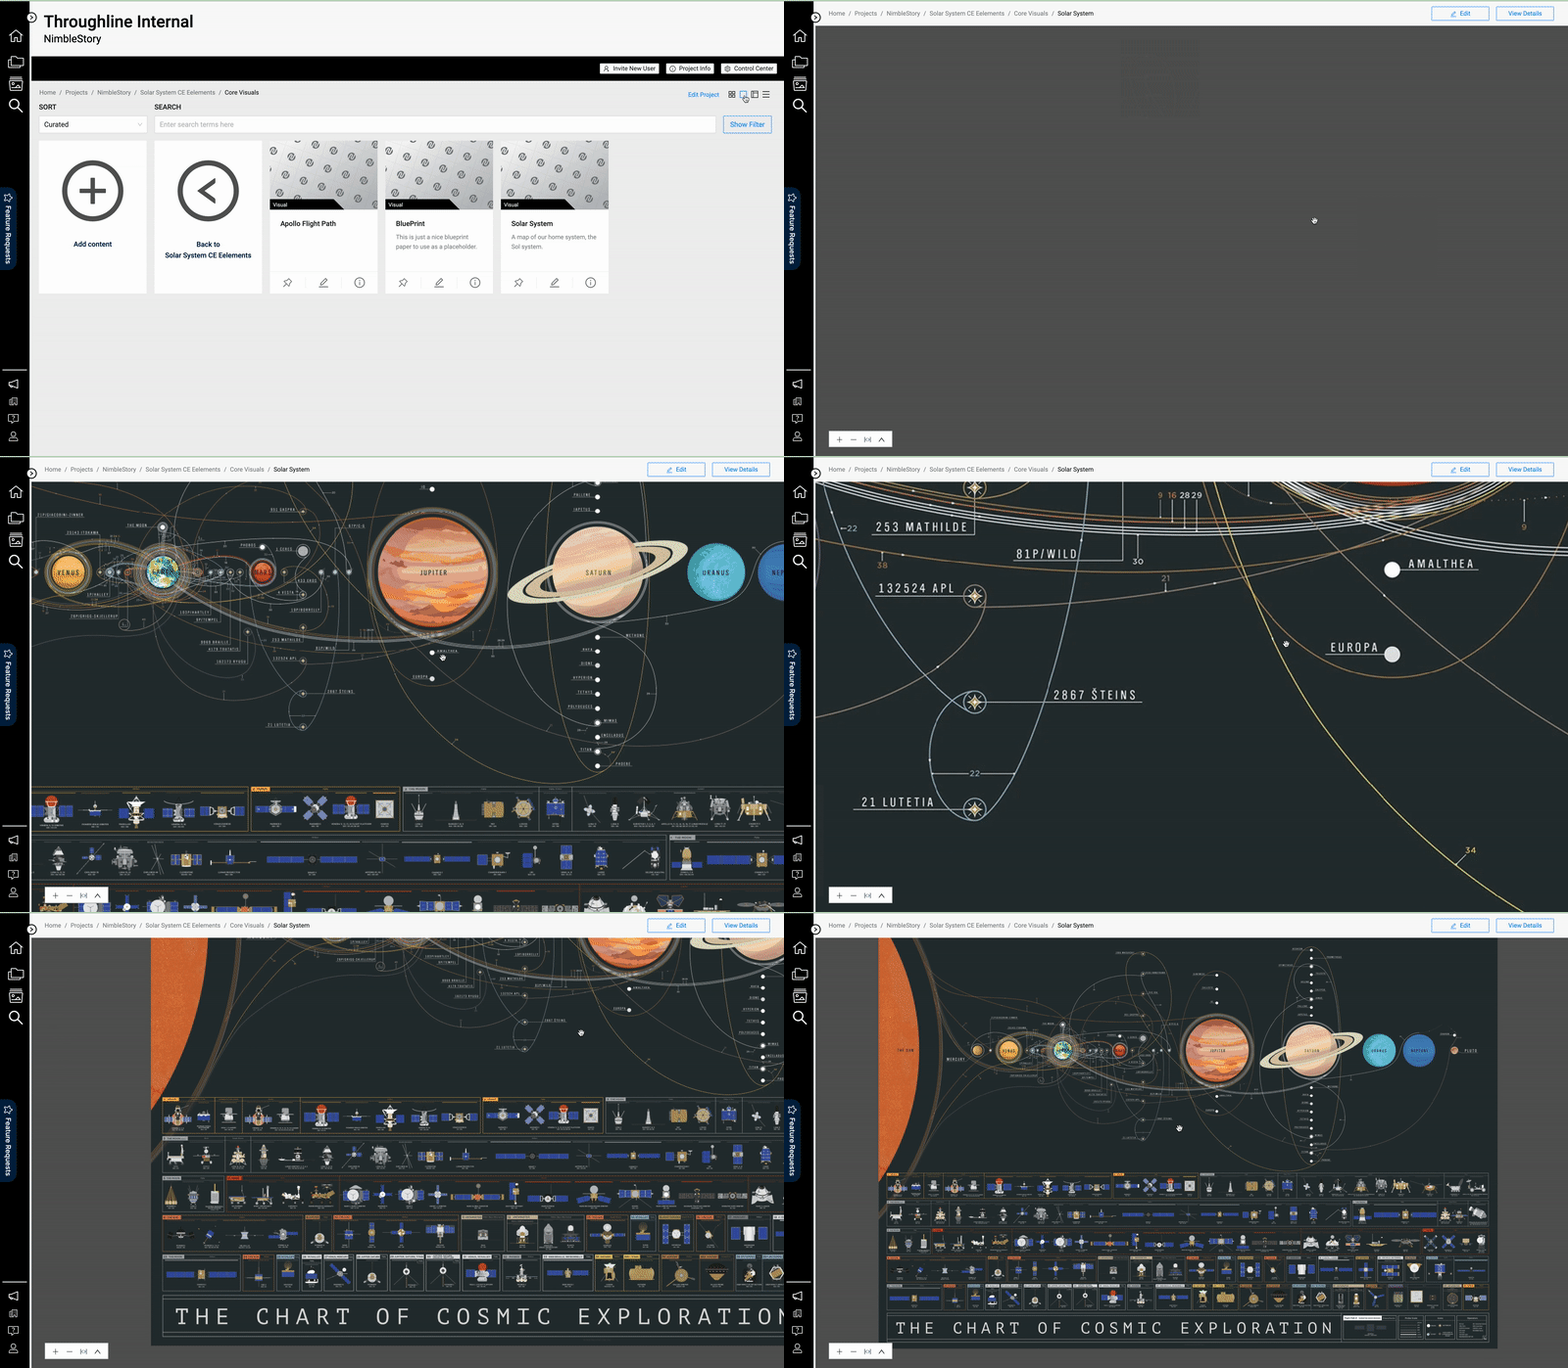
Example of Zoom Capabilities for a Core Visual
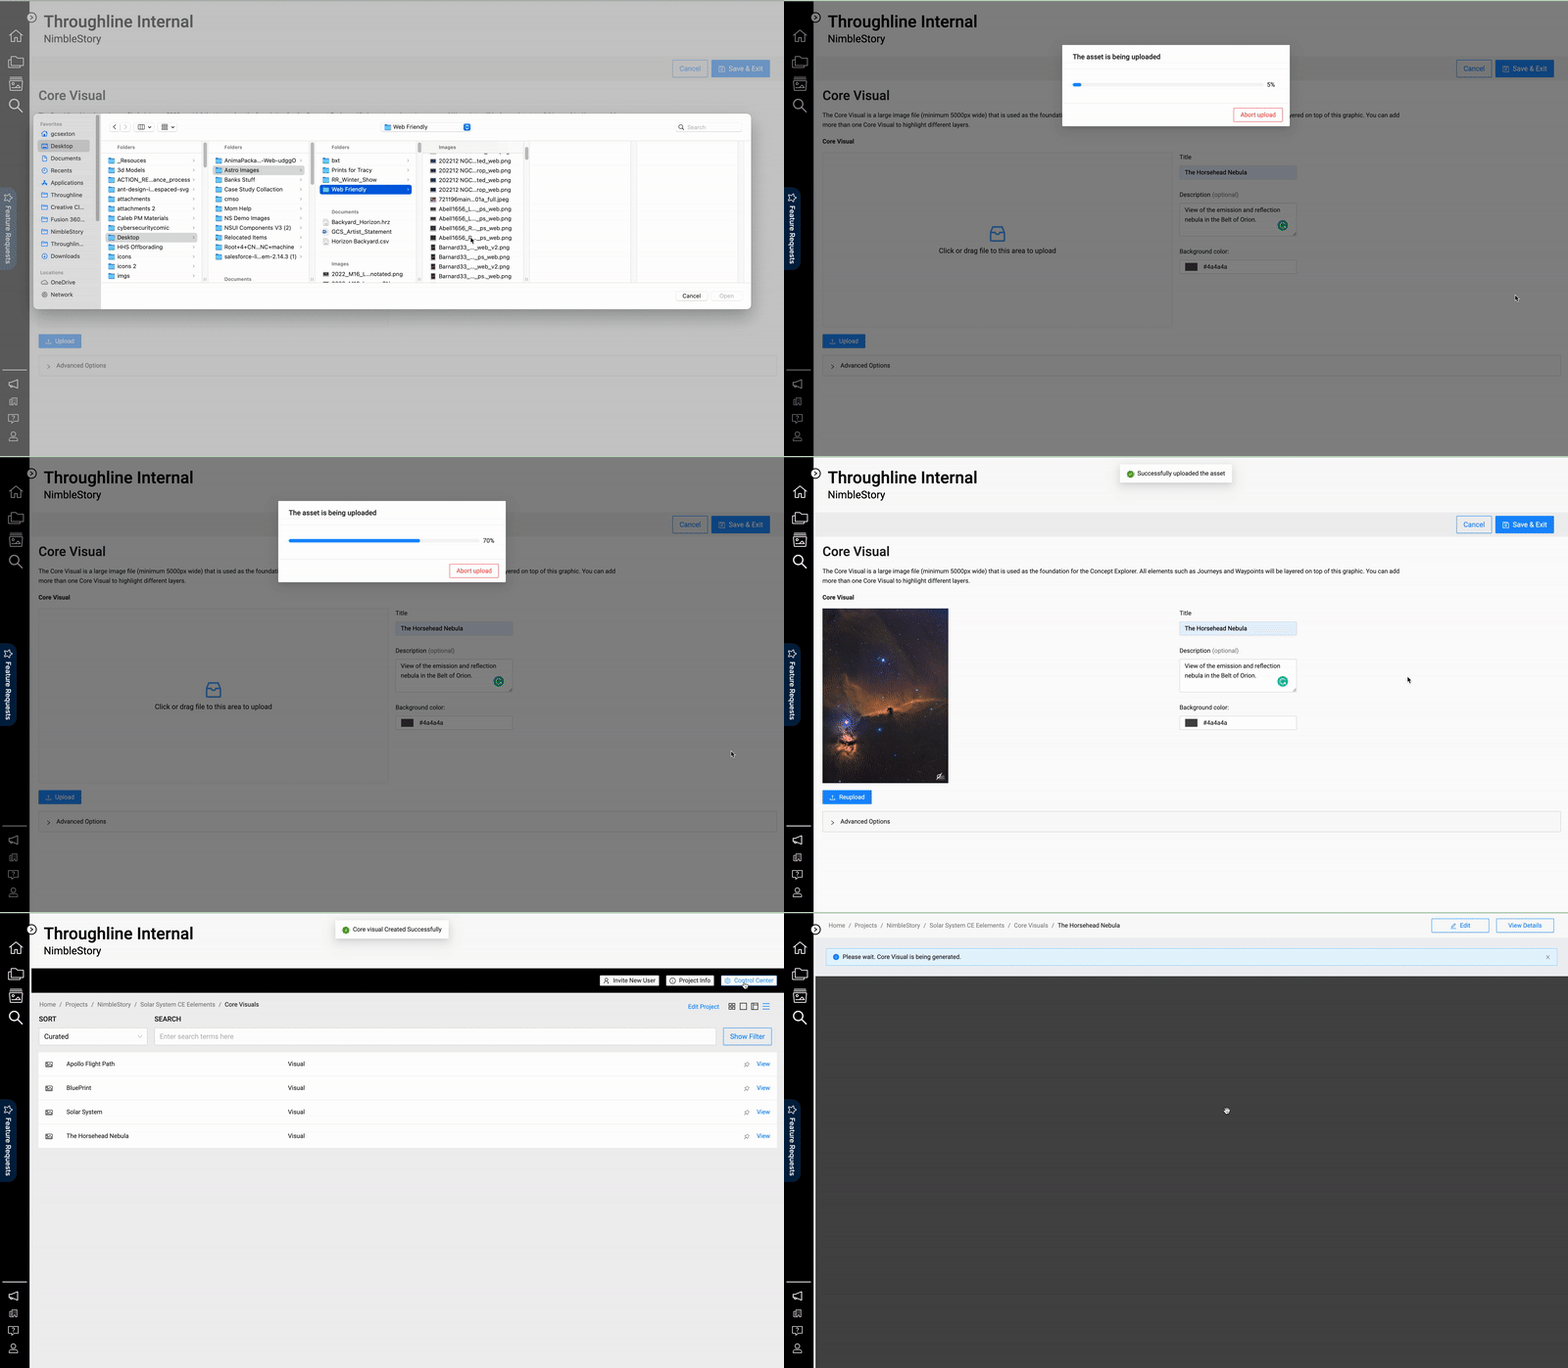
Core Visuals are a special kind of image that is dynamic. NimbleStory will take your image and transform it into an asset that has various zoom levels while maintaining high resolution. When you select the upload button or drag an image file onto the upload space it is recommended that your image be at least 5000 pixels wide for landscape oriented works, or 5000 pixels tall for portrait oriented works. This will ensure your Core Visual image will maintain a high resolution. See technical details below for more information on exactly how we convert your image to a Core Visual that is deep zoom capable.

There are also a set of Advanced options made available to you that are not necessary for simply creating a Core Visual. These options allow you to define:
Initial Center Point: Horizontal – the loading position of the Core Visual relative to the center of the image along the horizontal axis. This is by default set to 50% to load directly in the middle.
Initial Center Point: Vertical – the loading position of the Core Visual relative to the center of the image along the vertical axis. This is by default set to 50% to load directly in the middle.
Initial Zoom Modifier – allows you to set which level of zoom is applied to the Core Visual once it loads.
Minimum Zoom Level Allowed – allows you to set which zoom-out level is the furthest. This is by default set to 1 to load the Core Visual at its furthest point.
Maximum Zoom Level Allowed – allows you to set which zoom-in level is the deepest. This is by default set to 5 to allow the user to zoom in five levels to the deepest point.

To add the uploaded Core Visual you must select the Save button in the upper right corner of the screen.
NOTE: NimbleStory can take up 10 minutes to process and convert the image file into a Core Visual. If you access the Core Visual asset from the from the Project Details view you may not see the asset appear while the system is converting it.
📗 Core Visual - Technical Details
Core Visual Display in the UI - Core visuals are rendered in the UI using the same underlying technology that map systems use, Tiling. Each time you zoom in a couple of clicks, a new layer of image tiles is being used to keep the clarity of the images in focus.
Backend/ Data Settings affecting Core Visual display
The source resolution of the core visual, will result in 2 to 9 levels of tiles at different sizes. (the larger the source image, the more sets of tiles are available.
The minimum and maximum zoom levels set in the Core Visual, this can confine a Core Visual to a smaller range than the available tile sets.
The initial zoom modifier, this will click “in” or “out” after the Core Visual loads to ensure the intial focus is where the curator intends
Frontend/ User Settings affecting Core Visual display
First, the system will attempt to “FIT” the Core Visual to the available content area, this is determined by the users screen size and how big they have made their browser window.
Second, the system will apply the initial zoom modifier set by the curator and set the zoom in/out controls to the limits set by the curator
Third, the system will apply the zoom level changes driven by the user interacting with the Core Visual, or the Zoom Control buttons, or their mouse/trackpad
Finally, the system will apply zoom level changes as waypoints change, as the curator can set zoom offset for each waypoint as well
Creating a new Core Visual - Core visuals can technically be provided in any resolution, but because we typically target desktop displays with larger screens, we suggest:
IMPORTANT - these are suggestions only - the system will support just about any resolution being used as a core visual. SUPER large images though may take a long time to process and we have not tested anything larger than 20,000 px wide.
Landscape Oriented Core Visuals
suggested minimum is 5,000 pixels wide
at aspect ratio 16:9, this would make the expected height minimum about 2810
at aspect ratio 4:3, this would make the expected height minimum about 3750
this would make the total pixel Length + Height in the neighborhood of 7800-8800, which aligns to 5 TileSets in the section below **
Portrait Oriented Core Visuals
suggested minimum is 5,000 pixels tall
at aspect ratio 9:16, this would make the expected width minimum about 2812
at aspect ratio 3:4, this would make the expected width minimum about 3750
this would make the total pixel Length + Height in the neighborhood of 7800-8800, which aligns to 5 TileSets in the section below **
Core Visual Processing by the backend - When you upload a new or updated Core Visual, our system processes that visual into multiple sets of image “tiles” that the UI can use as it needs to - depending on the users browser resolution and current zoom level. Here is the logic that the backend uses to produce the tileset.
Note, this process can take 5-15 minutes currently, depending on the size of the uploaded source and how busy the server is taking care of other requests.
Set the Core Visual to “Processing”
When in this state, the UI will not be able to use it.
Calculate the total length+width in pixels
TOTALpx = Length (X) + Height (Y)
Determine how many tile sets are needed, based on the TOTALpx value
CASE: TOTALpx < 1000
Generate 2 TileSet levels, make level 2 the normalized level
CASE: TOTALpx 1000 → 3500
Generate 3 TileSet levels, make level 3 the normalized level
CASE: TOTALpx 3501 → 7000
Generate 4 TileSet levels, make level 4 the normalized level
CASE: TOTALpx 7001 → 10000 **
Generate 5 TileSet levels, make level 5 the normalized level
**this case aligns with our target minimum, so images can zoom in a fair amount
CASE: TOTALpx 10001 → 15000
Generate 6 TileSet levels, make level 6 the normalized level
CASE: TOTALpx 15001 → 20000
Generate 7 TileSet levels, make level 7 the normalized level
CASE: TOTALpx 20001 → 25000
Generate 8 TileSet levels, make level 8 the normalized level
CASE: TOTALpx > 25000
Generate 9 TileSet levels, make level 9 the normalized level
Generate the correct number of tile sets for the provided core visual
These are all stored as individual image tile files in a hierarchy of folders by zoom level
Prepare and store the tile set files for use and set the Core Visual to “Ready”
Once the Core Visual is set to “Ready”, the UI can use and render it for the user.
📋 Related articles
Audience | Public |
Section | NimbleStory Curators |
Status | Rough Draft |
Applies to | NimbleStory 3.0 and higher |
Next Review Date | Nov 2022 |
| Version | Date | Comment |
|---|---|---|
| Current Version (v. 6) | Feb 08, 2023 17:09 | @a user |
| v. 5 | Feb 08, 2023 17:02 | @a user |
| v. 4 | Feb 08, 2023 14:23 | @a user |
| v. 3 | Jan 20, 2023 20:02 | @a user |
| v. 2 | Nov 19, 2022 16:26 | @a user |
| v. 1 | Nov 19, 2022 16:12 | @a user |
